Black & White conversion in Lightroom
Posted: March 20th, 2014 | Tags: Photography • Tutorials | Posted in: Photography, TutorialsLightroom has some fantastic tools to help you create great black & white conversions, and while there are a number of ways within Lightroom to convert an image to black & white, I’ll show you the way that works best for me.
What makes a good black & white image?
This is obviously very subjective and different people have different ideas about what makes a good black & white image, so what I’m going to do here is explain what I consider to be the technical prerequisites for a good black & white image.
The term “black & white” gives a lot away about what is required in a good black & white image – black and white, and yes, this sounds obvious, but in addition to black and white, the images should ideally contain a good range of the greys in between black and white, too. Without the greys, black and white images tend to look very flat and dull.
This concept of well defined greys between pure white and pure black is known as “tonal range“, which simply means a wide range and clear separation of grey tones between pure white and total black.

The other secret to good black and white images is good tonal contrast. By “tonal contrast” I mean the difference between the light areas (highlights) and dark areas (shadows) in an image. So, ideally you should have bright highlights, dark shadows and a good range of greys. Dull highlights make images look flat, and a lack of defined shadow make images look “muddy” (a term used by photographers to describe an image lacking in overall contrast.)
An important thing about black & white photography is pre-visualising a scene converted to black & white before you take the shot, instead of going home and thinking “Oh, this might look good in b & w”. Shooting with the intention of later converting the image generally means more successful black & white photography because you’ll be thinking about contrast, shadow and highlights from the outset – at least that’s how it works for me.
Preparing images for black & white conversion
Before we delve into the nitty-gritty of black & white conversion, there are a few things I do to prepare an image, before refining it.
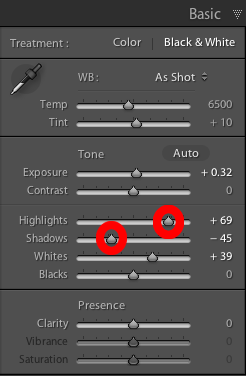
The first thing I do is go to the Basic Panel where I increase the Highlights and decrease the Shadows in the image. This makes the whites within the image whiter and the dark areas darker. You can also play around with the Blacks Slider and Whites Slider. Just play around with them, and remember what I said above about tonal range and contrast.
Enhancing highlights and shadows or blacks and whites has the effect of making the image look more dramatic and contrasty. The amount of adjustment depends very much on the overall contrast of the original image, and also the overall effect you’re after in your final image.
After adjusting the Blacks and Whites I use the Contrast Slider to increase the entire contrast of the scene, and again, this is dependent on the image and the look you’re trying to achieve. I try to avoid using too much contrast adjustment because images tend to look a bit silly when you ramp contrast up too much.
I then push the Clarity Slider up a little. I know everyone loves the Clarity Slider, but like most adjustments to an image, it’s important not to go way over the top with it – just enough to make things pop a little is enough.
Other touches (generally) include adding a bit of vignette, some local adjustment to bring out some of the shadows or lighten the foreground and finally sharpening of the overall image – the sort of stuff you’d do with any image.
Speaking of sharpening, if you haven’t used the Detail Panel in Lightroom before you can read more about my sharpening technique – it’s simple.
The HSL / Color / B&W panel
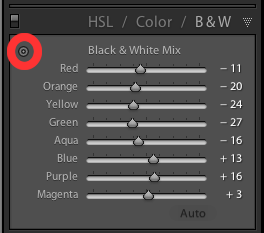
The HSL / Color / B&W panel in Lightroom is the place to go if you’d like complete control over your black & white conversion. When you open it up you’ll be presented with the Black & White Mix colour sliders, not only that, your image will be automatically converted to black & white, but it will be a very flat and boring black & white conversion!
The sliders you see in the panel allow you to adjust the black & white luminance (brightness) for each colour hue in your image. So, let’s say you have a large area of clear blue sky in the colour version of your image and you want to make that darker you just drag the Blue slider left until it reads -10, or something like that.
I very rarely use the Black & White Mix sliders as there’s a much simpler way – with the Target Adjustment Tool. The B&W Target Adjustment Tool works by clicking on the little icon highlighted in the image shown here. You then click on a area of the image you wish to darken or lighten (the cursor will change to show that the Target Adjustment tool is active). To darken an area of the image you drag downwards on the area, and to lighten the area you drag upwards until you’re satisfied with the result. This is a much more accurate way than manually adjusting the sliders individually.

When you’re satisfied with the tonal range, contrast and overall look of your photo just stop editing – I find that the more I tweak things the worse my images start to look!
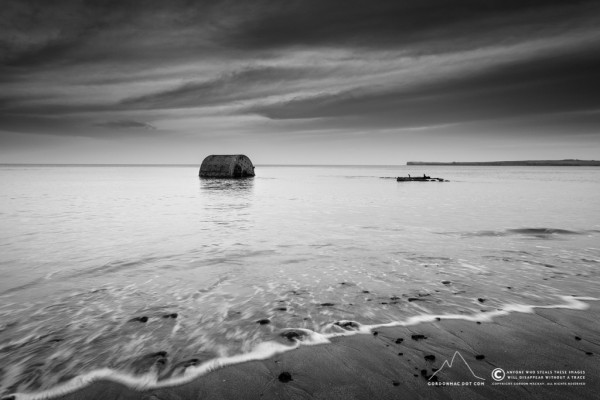
The finished image
That’s all :)