Cameras lie!
Posted: August 19th, 2014 | Tags: Photography • Tutorials | Posted in: Photography, TutorialsThis is one of the most important things I ever learned about photography, so this may well be the most important photography thing you’ll ever need to know, because not only will you understand exposure more, but you’ll also realise what’s causing your photos to go completely wrong at times.
Why do a cameras “lie”?
A modern DSLR is an amazing piece of technology, designed (and remarkably able) to do an awful lot, for an awful lot of people, in an awful lot of situations. It has an onboard computer to ensure the person pointing it gets the best photo possible, no matter what it’s being pointed at.
That’s all very excellent – until you have a creative disagreement with your camera. I mean, with all those microchips and geekery built-in to it how could it possibly not know what you wanted your photo to look like?
The simple fact of the matter is this: Your camera did everything it was designed to do, and it did it very well.
The reason the camera didn’t magically take the photo you specifically envisioned was probably because it only did what a camera is good at – measuring and capturing light – that’s all they’re good at!
Unlike you, the camera doesn’t see the scene in front of it, all it sees is the light reflecting from things within the scene. Based on a measurement of the reflected light from the scene, it will proceed to configure aperture, shutter speed and ISO settings to optimally capture that reflected light, and it does this in a completely mathematic and uncreative manner.
This process of the camera evaluating reflected light from the scene in front of it is known as “metering”.
It’s all about metering
For anyone unfamiliar with the term “metering” in a photographic sense, I’ll try to explain. Cameras, when used in the automatic modes (P, Av, Tv etc), attempt to calculate the settings required for a good exposure based on greys within in image because they don’t cope very well with extreme brightness or extreme darkness. As a result, the camera will take extreme shadows (pure black) and extreme highlights (pure white) and try to bring them back to grey, a middle grey – 18% grey to be precise.
As a result of the camera’s fondness of grey, you will probably have experienced these two scenarios at different times:
- You try to take a photo of something bright, but the camera wants the white to be grey and reduces the exposure, meaning you have a lovely sky, but the ground in front of you is black, you’ve lost all your shadow detail.
- You try to take a photo of something dark or black, but the camera wants the black to be grey and increases the exposure, meaning the ground in front of you looks perfect, but the sky is just a pure white blown-out mess, you’ve lost all your highlight detail.
It’s not right, I know, but like I say – cameras lie.
Persuading the camera to tell the truth
In spite of all the lies cameras tell, it is possible to make them a bit more truthful. Remember I said that the camera is very fond of middle (18%) grey? Well, the best way to make the camera truthful is to give it what it wants, by setting the exposure based on an area within your image that’s as close to grey as possible.
Simply point your camera at something grey or mid-toned, then dial-in the correct exposure (or press the Auto Exposure Lock (see your camera manual) button if you’re using Av, Tv or P modes), recompose and then take the shot. Simple!
Chances are that it’s not going to look perfect, but images straight out the camera are very rarely perfect, particularly if you have brightness and darkness combined in an image. The point is that you will have avoided losing shadow and highlight detail, which will allow you to creatively play with your image without having to fix anything. That’s good exposure!
If you like, you can get a bit creative by deliberately under or over exposing the scene using exposure compensation (see your camera manual). In fact, there are times where you will need to use exposure compensation, a few examples would be:
- Objects that should be white (like snow) need to be slightly over exposed, otherwise the camera will make them look grey,
- Objects that should be black (like hair on some animals and people) need to be slightly under exposed, again because the camera will make them grey.
- Objects with extreme backlighting need to be over exposed (a person standing in front of a bright sky or the sun), the camera sees all the brightness, reduces the exposure to bring the white down to grey meaning the object is rendered as a silhouette.
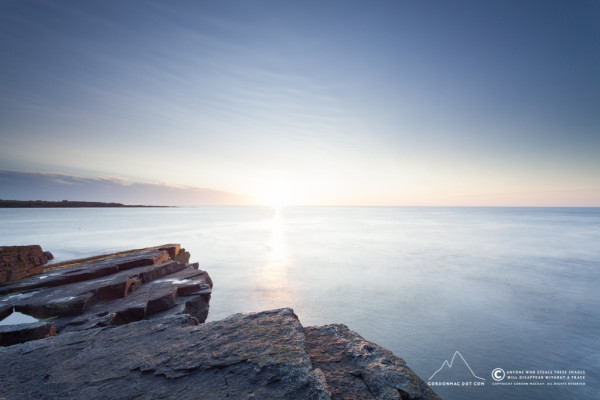
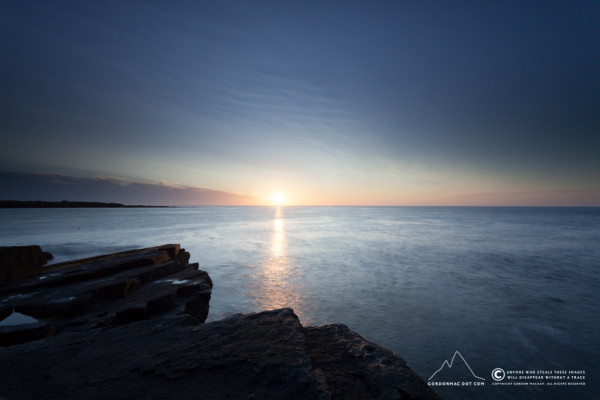
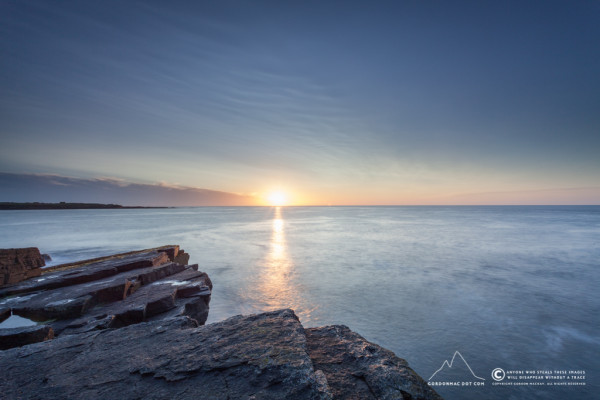
An example
Here’s an example of what I’ve been rambling on about, using a series of images I took a few weeks ago of a sunrise. Loads of shadows, and bright highlights are present in both sunrise and sunset photography, so while everyone loves photos of these events, finding the correct exposure is actually quite difficult!
So, there you have it, a simple way to get your camera to tell a truth that’s more in line with the way you saw it, and it will provide you with a solid foundation image to play around with in your editing software without you having to waste time fixing exposure errors.
Hope this helps.