Sharpening images in Lightroom (the right way)
Posted: March 5th, 2014 | Tags: Photography • Tutorials | Posted in: Photography, TutorialsIf there’s one thing every photographer wants, it’s a sharp image! We spend big on expensive lenses and tripods to achieve a high level of sharpness, and whilst those tools help greatly, there’s a lot to be said for doing some additional sharpening in your post processing.
For me, sharpening is not about recovering an image taken with a shaky hand or no tripod in the dark (they are 98% unrecoverable and go in the trash), it’s about enhancing sharpness and perceived clarity to make the image “pop”.
How image sharpening works
It’s useful to know how something works before you use it, because then you get a better handle on the benefits and limits of the tool you’re using.
In a nutshell, Lightroom achieves sharpening by exaggerating the brightness differences along the edges of objects within an image. Sharpening doesn’t reconstruct your image, it simply creates defined, pronounced edges within your images.
So, while sharpening is fantastic for selectively emphasising detail in your photos and preparing images for web and print, don’t expect miracles!
Be careful about what you sharpen
There are a couple of types of image where you need to be quite careful about sharpening:
- Portraits – Most people are not proud enough of their own skin to want to see it in the extreme detail produced by your fancy camera’s 22.3 megapixel full-frame CMOS sensor, and even more so where the resulting image has been further enhanced to extract as many pimples and blemishes as possible! Selective sharpening of the eyes, eyelashes, eyebrows, hair and lips is a much better tactic.
- Sunrises and Sunsets – Images where strong light is coming from a single direction hardly need any sharpening at all. If you think about what you see when you look at the setting sun – I bet you it’s mostly just silhouettes and nothing with any sort of overly defined edge. If you do indeed have a prominent object or birds silhouetted against the sun you could selectively sharpen those, and if you had a well lit foreground you could do the same.
In any image where you go overboard with the sharpening, the edges become over-pronounced. Dark objects in your image will begin to look demonically possessed, outlined with funny looking white halos (overshoots). The lighter edges will look similarly stupid outlined with weird dark halos. In a nutshell – your image will look crap.
Has this ever happened to you? Yes? Well, lay off the Sharpness and Clarity sliders, then it won’t! :)
Lightroom’s sharpening sliders explained
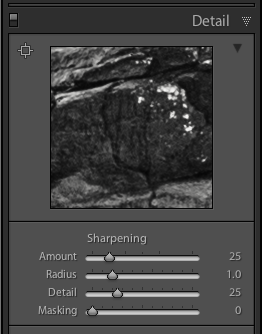
You can find the sharpening tools in Lightroom by expanding the Detail Panel. Once it’s open you will be presented with a set of four sliders. It’s important to understand what each of theses sliders do, and how they will affect you’re image as a whole when you change their values.
Amount – This is the overall amount of sharpening you want to apply to the image. Setting the slider to 0 means no sharpening, and pushing it all the way to the right means far too much sharpening!
Radius – This controls the size of the sharpening area around the edges within your image. Setting it to 1.0 means Lightroom will apply sharpening over an area of 1 pixel around an edge. Increasing the radius spreads the sharpening effect over a greater number of pixels and is likely to cause nasty halos around edges. I generally set mine to 0.8 or 1.0 and never really go above 1.2.
Detail – This controls the edge sharpening within your image. Lower numbers only sharpen large edges, while higher values like 100 will sharpen the finest details within your image. You have to be careful with the Detail slider, as pushing it too high will bring too much emphasis to any noise within the image, so it’s best if you try to stay around 50 or below is a good idea.
Masking – This tool masks (just like masking in Photoshop) areas of your image that shouldn’t be sharpened and takes care of the noise I mentioned above in the Detail slider. It works particularly well in the long exposure images I take, where the subject is isolated from a blurry background.
As I’ve mentioned, don’t be tempted to push these sliders too much, you will completely ruin your images. Over sharpening is ugly when you see it compared to an image where care has been taken to selectively sharpen details for maximum impact. The same thing goes for most of the tools in Lightroom.
The best bit – The Alt (Option) key for sharpening in Lightroom
This is possibly one of the most important things you’re going to learn about sharpening images in Lightroom from this tutorial. The Alt/Option key is a hidden gem in Lightroom’s Sharpening toolbox.
Earlier, I mentioned that sharpening should only be applied to the edges of subjects and you don’t really want to apply it to the areas of your images with smooth backgrounds such as the sky (particularly in sunset and sunrise pictures) or the moving parts of a long exposure shot. Thankfully Lightroom really helps us out here.
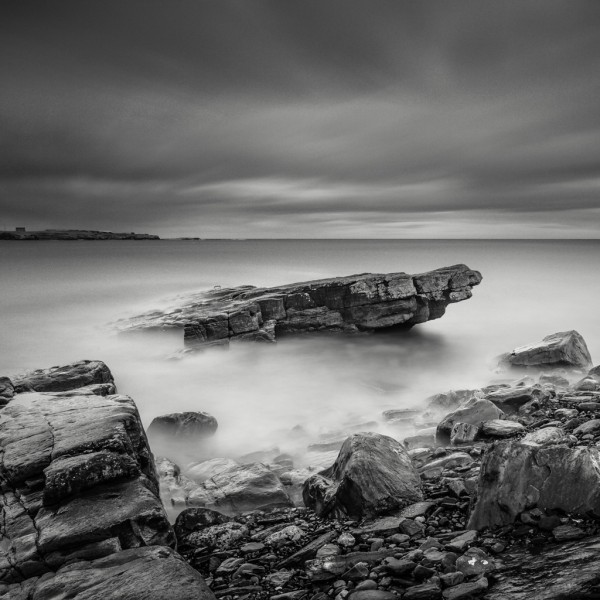
Let’s take an image and I’ll show you how I’d sharpen it. As you can see, it has large smooth areas (sky and water), but it also has some nice edges in the foreground and subject that we can sharpen up a bit.
The first steps are simple, and the values very much depend on the image your editing:
- Go to the Detail Panel.
- Zoom in to 100%
- Set the Amount slider to 50 (Remember, this depends very much on the image, so don’t just do what I do here).
- Set the Radius slider to 1.0.
- Set the Detail Slider to 75.
- The next part is where that Alt/Option key becomes amazing: Hold down the Alt/Option Key and move the Masking slider back and forth…
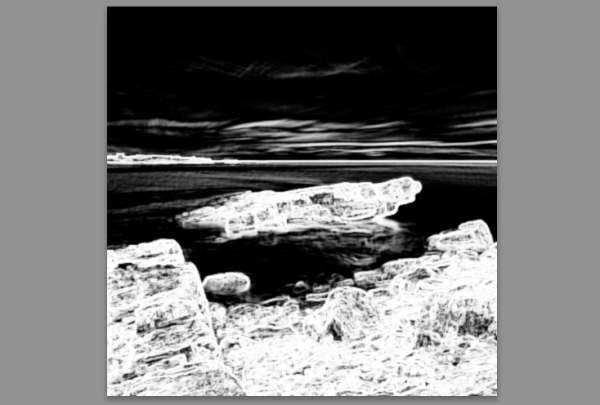
This is the Visual Sharpening Mask. It allows you to see exactly where the sharpening is taking place within your image, and I don’t want any sharpening taking place in the water or sky. So I want my Visual Sharpening Mask to look like this:
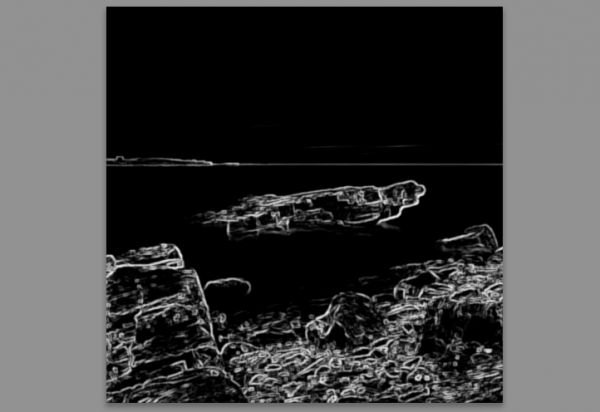
You’ll notice the sky and water areas of the image are completely black now. This means that no sharpening will occur in these areas, and that’s precisely what I wanted. Here’s the final image:

The image doesn’t look remarkably different, that’s because it was already sharp. All it needed was some selective sharpening enhancement to the edges of the rocks in the foreground and the large rock.
So, just to recap: Use masking and all the sharpening tools Lightroom has to offer, but only sharpen the areas of the image requiring some detail emphasis – and don’t overdo it or you’ll end up with a crappy photo :)