Why use Graduated ND Filters?
Posted: April 9th, 2014 | Tags: Photography • Tutorials | Posted in: Photography, TutorialsIf you can imagine yourself standing on a beach, looking out across the sea at a sunset (something that pleases most photographers), your eyes allow you to see a nice balance between the light and colour in the sky and also what’s directly in front of you. A camera can’t do both, or at least it can’t do both very well . It will try to either expose correctly for the bright sky (by reducing the overall exposure) making your foreground go dark, or expose correctly for the darker area in front of you (by increasing the overall exposure) blowing out the sky and making it go white – which isn’t too handy in sunset photography!
Thankfully graduated neutral density filters can help with this!
What is a Graduated ND Filter?
Graduated neutral density filters (“ND grads” or “GNDs”) are simply transparent glass or resin filters, placed in front of your lens to balance exposure between bright sections of an image and darker sections – typically the sky and the foreground. They have a dark neutral grey area at the top which transitions to clear. The dark bit covers the bright sky to dull it down a bit and the foreground can then be properly exposed.
The “neutral” part of “graduated neutral density filter” is quite important. It means that the grey is completely colour-neutral. If it isn’t, you end up with blue, purple or warm red colour tints in your photos, and while these are not difficult to remove in Lightroom or Photoshop, it’s quite nice if you don’t have to.
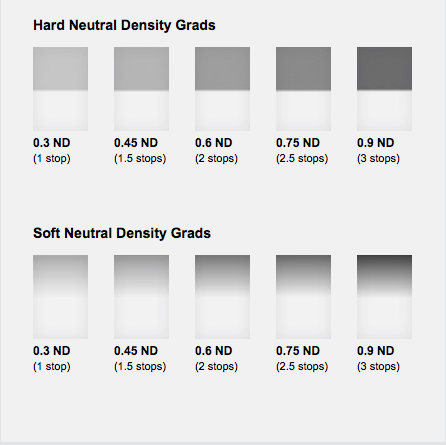
You’ll notice that the image of the filters above demonstrates the number of options you have in strength. Each company seems to represent the amount of light reduction differently, so here’s a table of the possibilities with the actual number of stops reduction for each.
| Density | Filter Factor | Light Reduction |
|---|---|---|
| 0.3 | 2 | 1 Stop |
| 0.45 | 2.5 | 1.5 Stops |
| 0.6 | 4 | 2 Stops |
| 0.75 | 7 | 2.5 Stops |
| 0.9 | 8 | 3 Stops |
Here’s a couple of examples of how the densities affect brightness:
- If you use the 1 stop (0.3 ND) ND grad and had the top dark section covering the sky in your image you would be reducing the light from the sky by half (remember, in exposure a 1 stop reduction halves the light, and a 1 stop increase doubles the light).
- If you use the 3 stop (0.9 ND) ND grad and had the top dark section covering the sky in your image you would be reducing the light from the sky by 8 times (2 ^ 3 [3 being the number of stops] = 8).
This sounds quite difficult – I know! I scratched my head several times when I was first getting to grips with how exposure “stops” work. However, the more you use your camera, the more you’ll get used to what stops actually mean.
The other thing you may have noticed about the ND grads in the image above is that some of them are soft-edged and some are hard-edged. Typically hard-edged ND grads are used for images with a clear, straight line between the light and dark portions of the image (seascapes for example), and soft-edged ND grads are for undulating horizons, like hills and mountains.
Note: My personal preference is for hard-edged ND grad filters, it’s much easier to control the exposure balancing, and they actually work fine when things protrude slightly above the horizon.
The other thing you’ll probably need is a holder for your filter, particularly if you are going to be using ND grads for longer exposures. There is a caveat with most filter holders, and that is that they cause vignetting if you use them on wide-angle lenses. If you aren’t using massively long exposure times you can simply hold the filter against the front of your lens, and also save yourself some time and cash.
If you do buy a holder, make sure you get one designed to accommodate the width of filter you buy.
How do you use ND Grads?
This part is simple! Here’s what I do:
- In Manual Mode (if you haven’t learned how to do this yet, please look it up) set the appropriate aperture (for me that’s f/11, f/16 or f/22 for landscapes).
- Point the camera down at the foreground in front of you, then meter and set the camera to the correct shutter speed for a correctly exposed foreground.
- Point the camera at the sky (without the sun in the frame), and very IMPORTANTLY count (and remember) the number of clicks you have to increase the shutter speed by before the camera tells you the sky is exposed properly.The reason for this? – On most cameras 3 clicks is equal to 1 stop of adjustment (check to see if your camera is set to 1/3 stop increment adjustments in the settings). So, now I know that if I had to increase the shutter speed by 6 clicks my sky is 2 stops brighter than my foreground, and I now know that I need to use a 2 stop ND grad to balance the sky and the foreground! Excellent!
- This is also important: Change the shutter speed back to the exposure you set for the foreground. The ND grad is going to control the extra light you added to expose the foreground correctly.
- Attach your filter.
- Compose your shot and adjust your filter so that it aligns the way you want it to.
- Click.
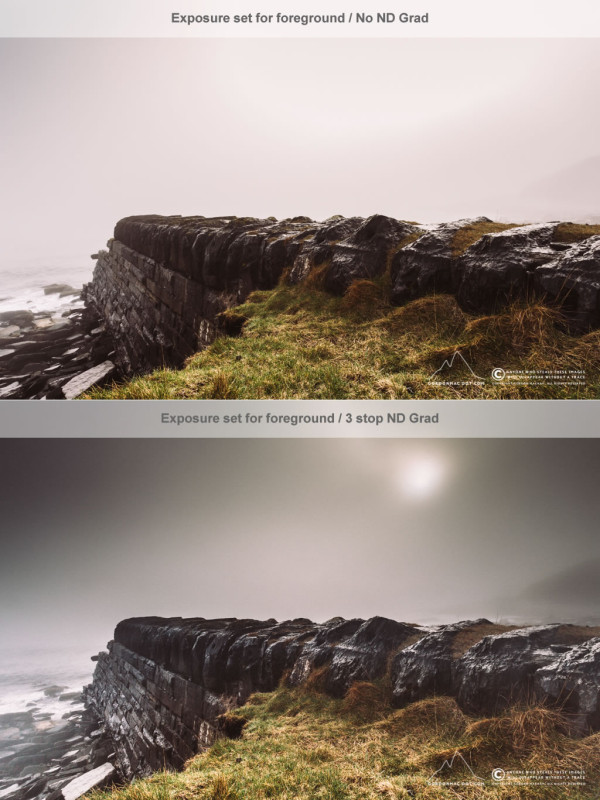
In the above example I used a 3 stop (0.9 ND) filter to darken the sky even more, I quite like doing that.
Which filters should I buy?
That depends on how much you think you’ll use them and what you can afford. I use them quite a lot, but have mostly stuck with 3 stop soft and hard edged filters. In terms of price, and as far as I can tell, the main differences between cheap and stupid is the amount of colour cast (or lack of “neutral” in the “neutral density”), and size of the overall filter.
There are essentially three trusted brands of ND grad filter, and I’ll list them in order of price (cheap to expensive): Cokin, Hitech and Lee.
I started with Hitech, but have adopted Lee filters so that I can take very wide-angle long exposure shots. They have the best filter holder system I’ve seen, and it allows me to use ND grads at 17mm on my full-frame DSLR. If I wasn’t taking so many wide-angle long exposure shots I’d have stuck with Hitech (I do still use them) as they are about 50% of the price of a Lee filter. I haven’t used Cokin filters, so can’t comment on their quality – but I know plenty people who do, and their photos look fantastic!
There’s a lot of silly debate about filter quality, and I hear people saying things like “why would you spend thousands on lenses and then put a cheap piece of plastic in front of it”. Well, I did that for a long time, and I can assure you that neither sharpness nor quality were compromised from using £25 Hitech filters. I also wasn’t as bothered about scratching them by ramming them up and grating them against the front of my lens either. There was some colour casting on the images, but that never took me more than 4 seconds to fix in Lightroom.
The other option is to save your money completely and do everything in Lightroom. I do this quite often. As long as you haven’t clipped highlights or shadows then Lightroom has an incredible Graduated Filter Tool.