Quick tip: Getting rid of image “banding” in Lightroom
Posted: March 31st, 2014 | Tags: Photography • Tutorials | Posted in: Photography, TutorialsBanding is one of those things no one wants in their photos, it’s really ugly, and quite often frustrating to get rid of. However, like most things, understanding the problem helps you fix it.
What causes “banding” and what does it look like?
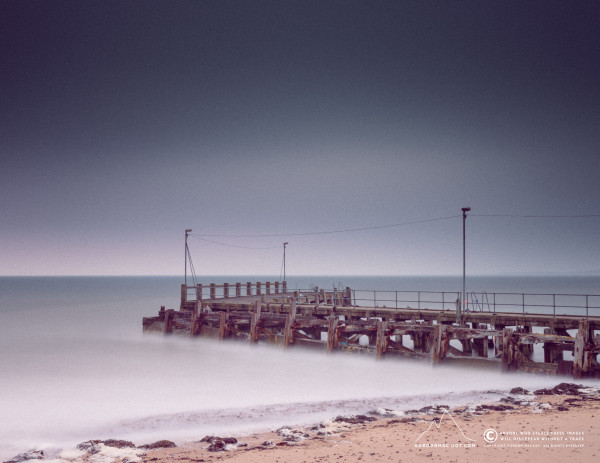
Banding is caused by a general lack of information in sections of an image, and that’s why it’s so pronounced in the following long exposure shot I took.


The long exposure has flattened out the sky to the point where there’s no tonal variety. This causes a problem with the “algorithm” used to compute and render the digital image. If too many similar tones are spread out beyond the area computable by the algorithm it will invariably fail, rendering your image with horrible tonal bands. Blurring areas of an image, and/or reducing the clarity can also cause banding.
Fix banding by adding grain to your image – Simple!
You can try lowering the contrast, lowering the clarity – in fact, you can spend hours trying to fix it, but there is only one sure way to get rid of it… grain!
It may sound a bit crazy, but adding grain to an image eliminates banding. Why? Well, it’s quite simple. When you add some light grain to the image you’re effectively adding some image information to the area that was previously devoid of any.
You don’t need to add a ton of grain, so don’t worry about grain wrecking your image. Also, if you need to add a bit more grain than you expected, just remember that grain is better than banding! – by a country mile!
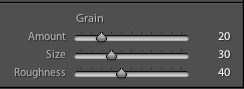
In Lightroom I find the following settings work well for most images:
- Go to the Detail Panel.
- Set Amount to 20.
- Set Size to 30.
- Set Roughness to 40.
You’ll probably need to experiment a little depending on the image, but this method will certainly save you a few sore heads, as well as trashed images.
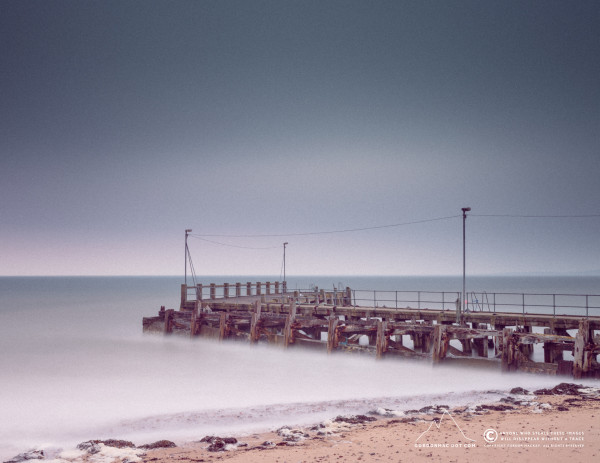
The fixed image
Here’s my image, with the worst of the banding removed using grain.
As a final step I reduced the exposure of the sky, and everything seemed much better:
Hope this helps :)